
Following the plan to use a drag-and-drop builder, I decided to test Systeme.io (which I refer to as “Systeme” in my dashboard). The visual automation flow you see in my dashboard is the backbone of this system. Let me walk you through the exact steps I took, explaining not just how to click, but why we do it this way.
(Note: I will insert my actual screenshots here showing the backend interface.)
Following the plan to use a drag-and-drop builder, I decided to test Systeme.io (which I refer to as “Systeme” in my dashboard). The visual automation flow you see in my dashboard is the backbone of this system. Let me walk you through the exact steps I took, explaining not just how to click, but why we do it this way.
Registration:
Open the Systeme website and you can choose to log in with your Google email address or register an account.
Use tags
Use tags to differentiate between different users.
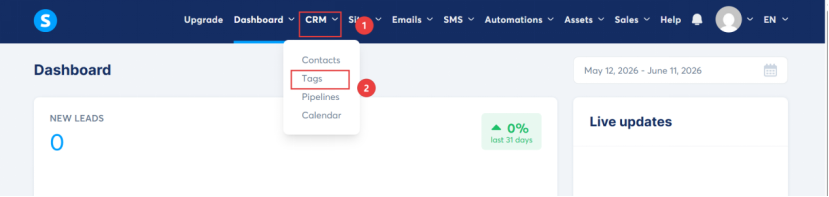
After logging in, click on CRM to bring up a drop-down menu, then click on Tags.
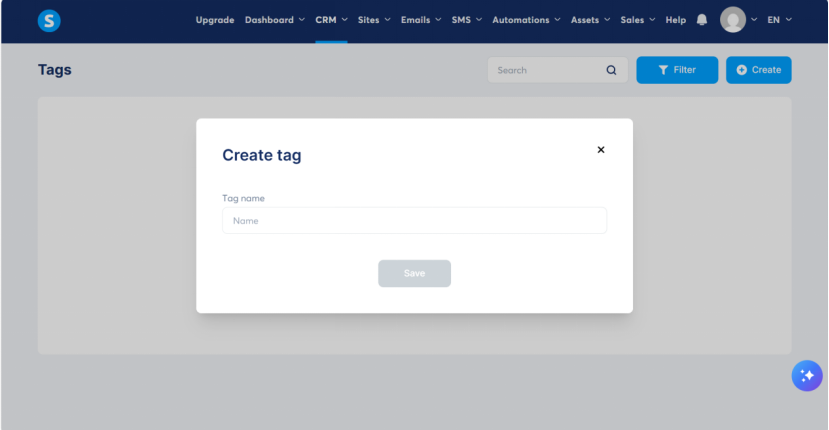
After opening, click “create”, and the “create tag” box will appear.
The Role (Purpose): Tagging is the secret sauce of modern email marketing. It allows you to segment your audience. Anyone with this tag is now labeled as someone who downloaded the checklist.
*What Happens If You Skip This? You lose the ability to personalize. You won’t be able to say, “Hey, since you downloaded my checklist…” in your follow-up emails. Personalization increases sales by 200% or more.
Bind domain name:
With Google and Yahoo’s new policies, emails sent from a free email address are likely to end up in the spam box and hurt your business. It’s highly recommended to send emails from your own custom domain
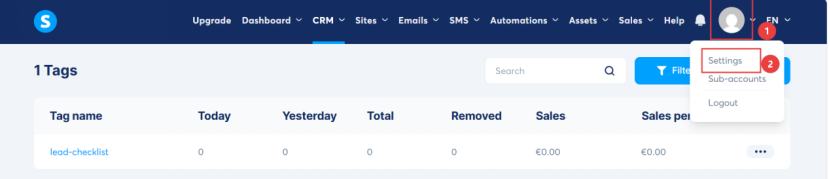
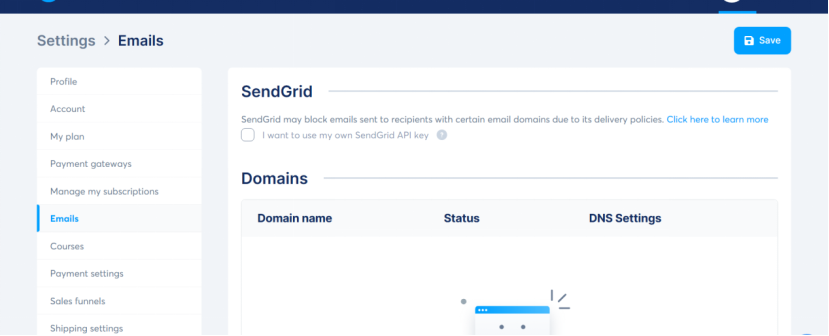
Then bind the domain name. First, click the user avatar circle, then click “settings” in the drop-down menu.
I must commend Systeme here; its free version allows you to bind one domain, which is more powerful than before and beginner-friendly. The paid version is also cheaper than competitors. If you don’t want to use your own domain for now, you can skip this step. The subsequent opt-in page link will be a Systeme subdomain, which is usable, but less professional and not conducive to future branding. It’s up to you. If you’re buying a domain, NameSilo is the most cost-effective on the market in terms of registration and renewal prices. .com domains are the most universal and have the highest recognition; it’s best to get a .com domain from the start to avoid the need to change it later.
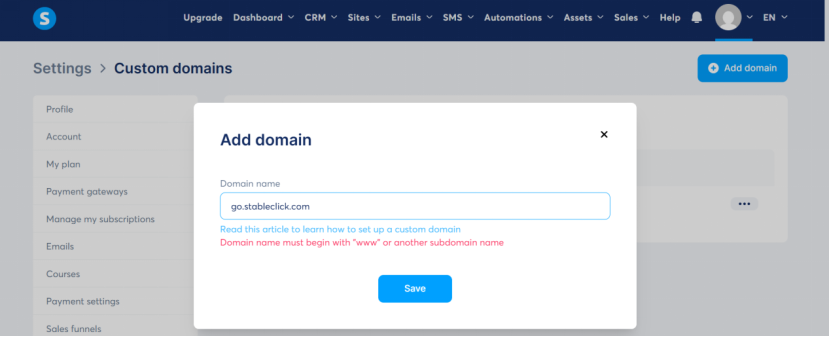
Click your avatar,click setting and select custome domains.
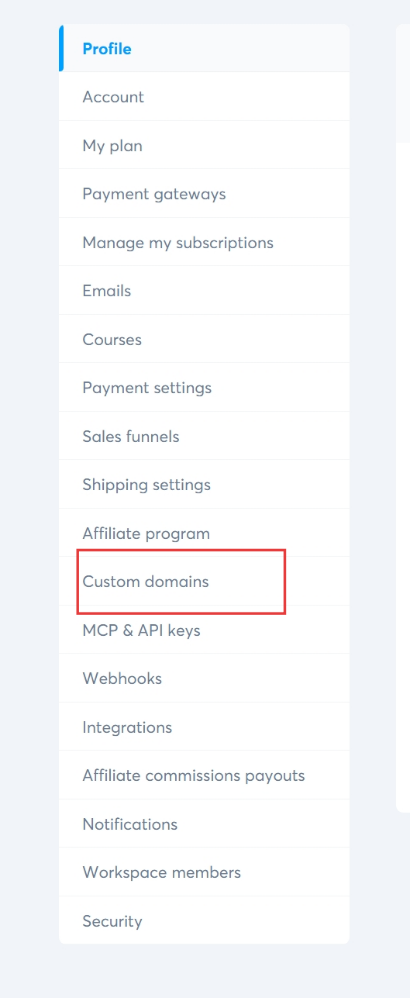
Find “Custom domains” on the left and click it.
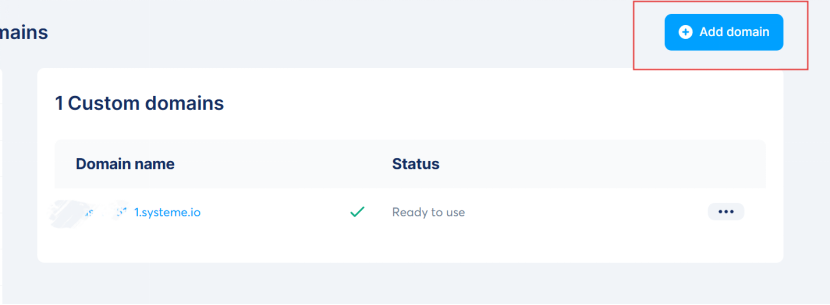
You’ll see a provided subdomain. To bind your own domain, click “Add domain” in the upper right corner, enter your subdomain, for example, change “www” to “go” (I entered go.stableclick.com), and click “SAVE”.
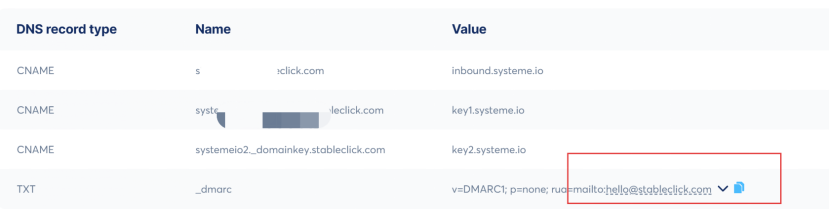
At this point, a binding requirement will appear. Open your domain’s DNS. If you have already bound it to your web hosting provider, then it will be under your web hosting provider; otherwise, it will be under your domain registrar.
To show the comparison, please fill in the corresponding position as shown in the figure to avoid errors.
I use Hostinger for my website hosting because I’m used to it, but you can use others as well. The DNS settings for other hosts are the same. For security and privacy, I’ve blurred some images, but it doesn’t affect readability.
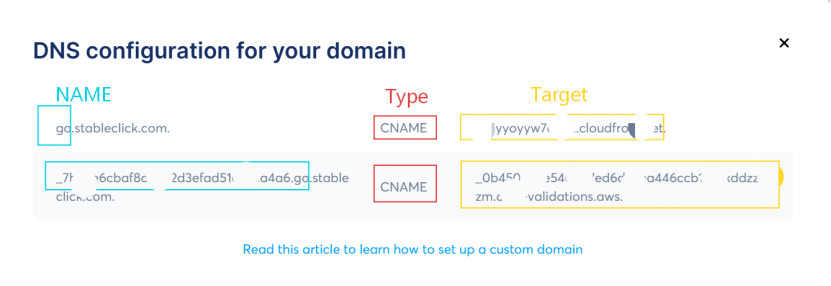
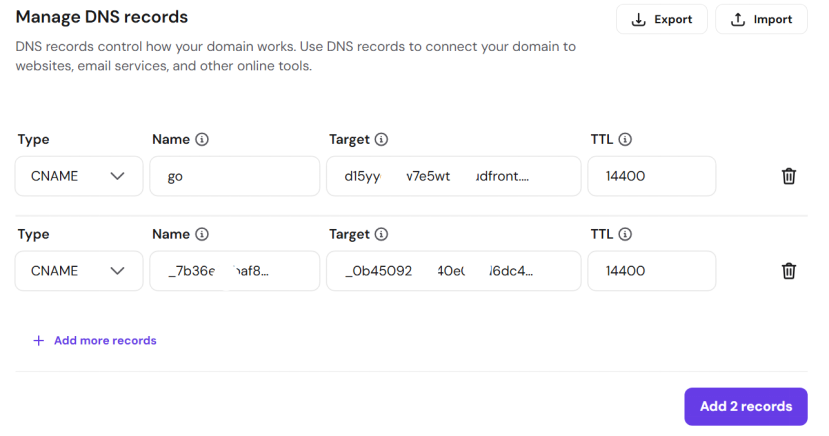
Clicking “ADD more records” will add more rows. Enter the corresponding rows as shown in the image. Note that you should not include the last dot in any of the rows you enter. Then click the purple “ADD 2 records” button to save.
Then, open dnschecker.org, enter the subdomain you bound (e.g., mine is go.stableclick.com), select CHAME, and click check. If you see all green checkmarks, it means it’s correct.
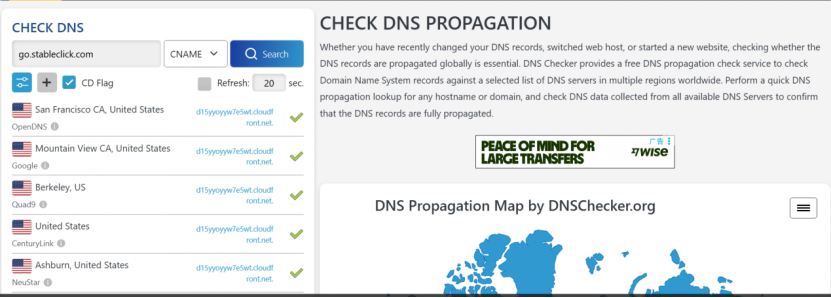
Then wait a maximum of 24 hours for it to take effect, sometimes as quickly as a few minutes. Once it takes effect, the right side will show “Ready to use”.

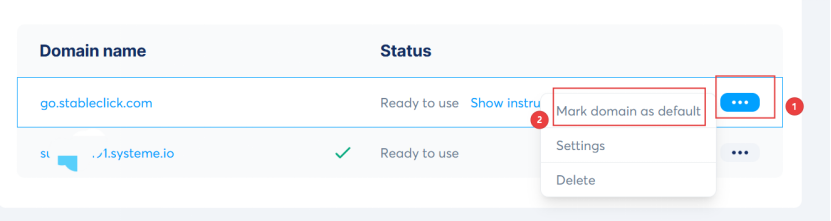
The domain name currently in use will be displayed with a green checkmark. It is currently in the subdomain section provided by the software, so you need to click the three dots to the right of the subdomain you want to use, then click “Mark domain as default,” and then click “confirm.”
Create an opt-in page
Next, click Site in the navigation bar, click Sale funnel in the drop-down menu, and then click create.
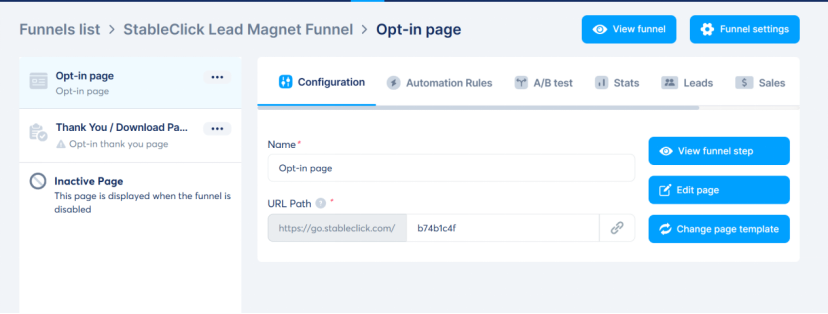
In the Name field, enter “[YOUR BRAND NAME] Lead Magnet Funnel,” for example, I entered “StableClick Lead Magnet Funnel.” The domain name is the one I just set. Select “build in audience,” and then click “SAVE.”Now, open the newly created funnel name, then click on the colored website template style on the right. The screen will appear as shown in the image. Click “EDIT PAGE,” and then you can edit the webpage.
The page should contain at least the essential elements, and you can also add your own guidance as appropriate. Many settings can be left as default if the requirements are not high.
Heading:
Get the xxxxx
Paragraph (Subtitle):
Enter your email to download the PDF xxxxxx and join [your brand] updates.
Form (Form Block) ← This is the core
(Optional) Small print: We respect your inbox. Unsubscribe anytime.
Go to Form Settings (Right Side/Floating Layer) and do three things:
Fields: Only include Email (Name is optional, but the first version recommends only using Email for higher conversion rates).
The Role (Purpose): This is your digital handshake. It is the bait that convinces a visitor to give you their most valuable asset: their email address.
*What Happens If You Skip This?If you don’t have a dedicated opt-in page, you have nowhere to send traffic. Visitors will land on your generic homepage and leave without taking action.
.
Create your thank you page.
Only three items should be placed on the hank You page (minimum and most reliable).
Use blocks (don’t pile up text, don’t include navigation/menus):
A. First line: Confirm
Heading (H1):
You’re in ✅
(Or the checklist was sent to your inbox if you plan to email the PDF as well.)
B. Second line: Download (optional, but many people prefer “double delivery”)
Paragraph / Place a Button / Link pointing to your PDF (direct link):
Download your Checklist PDF
(Use the direct link in Systeme Files; you need to upload your gift information to Systeme Files.)
C. Third line: Small print (to prevent panic about unsubscribing)
Paragraph (12–13px, gray):
If it doesn’t arrive within 2 minutes, check Promotions / Spam.
Reply if you need help.
In Page Settings (gear icon in the upper right corner):
Header: None / Minimal (Don’t include the main site menu)
Footer: None / Minimal
Background: Keep it consistent with the Opt-in page (white or light gray).
Save.
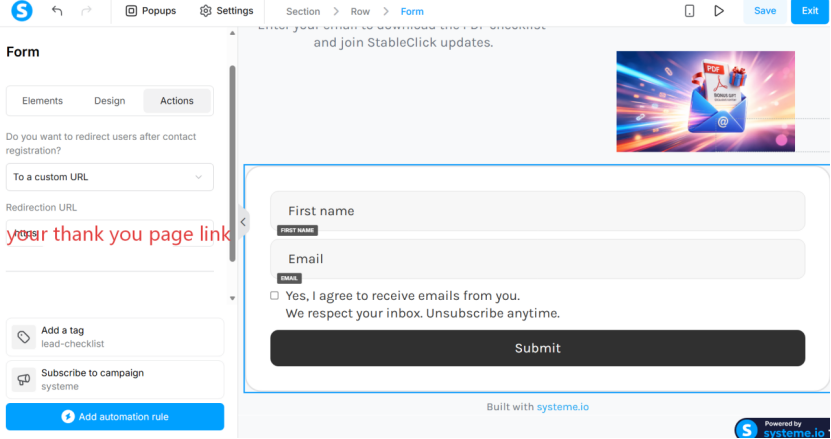
3) A crucial step: The “After Submission” option on the Opt-in Page should point to this location.
Return to the canvas → Click Opt-in Page → Edit
Locate the form (click the Form block / Settings on the right):
Select “to a custom URL”, paste your thank you page link, and click the save icon.
Set up your email
Click the circle icon in the upper right corner, click settings, then click Email on the left.
Add your domain name and your email address, preferably your website’s email address. For example, mine is hello@stableclick.com . I’m using Hostinger hosting, so I just need to click “setup email” on the Hostinger website, set the email prefix (the part before the @), and I’ll get an email address with a one-year trial period.
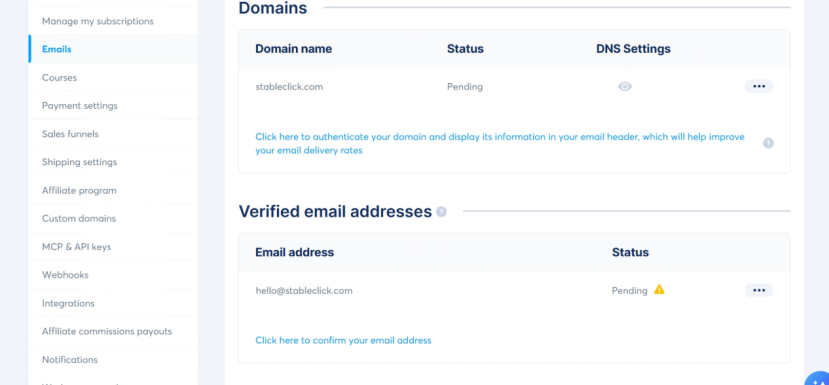
The status is currently pending. You will receive a verification email in your website inbox. Click the verification link to complete the verification.
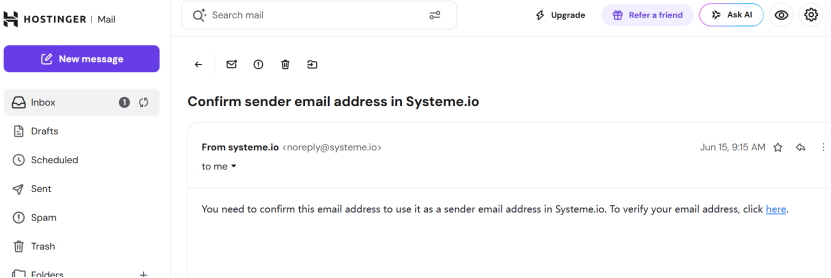
Domain verification requires following the domain’s DNS settings, similar to the previous domain binding process, and it’s quite straightforward, so I won’t go into details here. If you have any questions, you can subscribe to my emails and send me your questions, preferably with screenshots.However, please note that since you are using website emails, select your website’s email address instead of your registered email address in the email field below.
Wait for the DNS to take effect. Once it does, you can select your website email address in the sender settings.
Set up emails
Click CRM, then CONTACT, add contact, fill in the information, and use your website’s email address.
Click EMAIL, click campaign, click create to create an email and specify the sending time. For example, send one email today, one day later, and three days later.
Test the entire process
Back to Systeme:
Contacts: See this email address ✅
Tags: Seeing the tagname ✅
Rules tab(under the Automations) : You can see that this Rules has been actived. ✅
The emails in Campaigns tab should be actived.
Go to your opt-in page:
Submit using the second email address
Go to that email inbox (containing spam/promotions): Received Email #1 ✅
Ready to Start Building Your Own System?
Watching me talk about checklists is great, but doing it yourself is where the real magic happens. You will receive swipe files for high-converting welcome email subject lines and notifications for my hands-on articles.
[Click Here to Subscribe and Get Your Free Files!]
Enter your email below, and I’ll send it straight to your inbox. No spam, just actionable advice to get you started.